Crypts of Kodor
Intro
After a good long rest the party is ready to progress forward further into the caverns. Before progressing, Billy calls the groups attention to him and says “We’re about to enter now — for real this time though. While inside I’ll be looking out for what I need. But I’ll need someone to handle the braziers for me.” He pulls out a large striking stone and a steel rod about the size of a dagger. “You’ll need these, they’re the only way to light the braziers. May the gods of Kodor protect us.”
Features
The crypts of Kodor are on three levels, broken out into separate chambers and hallways. All levels are connected by stairs, and the areas of each level are separated by portcullis gates and stone doors. The key objects in the crypts are the statues of Kodor that once held the magic seals (currently broken), the braziers of balance, and lots of sarcophagi. Broken Seals. Each of the broken seals that the characters must collect is a piece of carved marble scribed with the symbol of Kodor, and weighing about 4 pounds. All the seals were once held by statues of Kodor scattered around the crypts. Doors and Gates. The areas of the crypts are separated by either iron portcullis gates or stone doors. The portcullis gates allow characters to see through them into the areas beyond. Most doors and gates are opened magically using levers on the “front side” of the door, closest to the entrance to the dungeon. This design was intended to allow areas of the crypts to be closed off from the outside if needed. Pulling a lever to raise or lower a door or gate is an action. Once open, a door or gate stays open until the lever is pulled again, or unless a door closes automatically as a security measure. If the characters are worried about someone closing the doors behind them, an open door can be held open by wedging a spike or similar object between it and the adjacent wall with a successful DC 12 Strength check. Unless otherwise noted, a door that has been closed can be forced open manually with a DC 25 Strength check, or can be opened with a knock spell or similar magic. All portcullis gates in the crypts creak and grind loudly when raised. The stone doors open with a loud scraping sound. Ceilings. Unless otherwise indicated, corridors and rooms in the crypts have ten-foot-high ceilings. Light. Many of the areas on the first level are lit by magical torches imbued with continual flame. In other areas (including both the lower levels), there is no light except what the characters bring with them. Sarcophagi. Numerous stone sarcophagi are set throughout the crypts. Unless otherwise indicated, all are closed. Any closed sarcophagus can be opened with a successful DC 20 Strength check, but contains only moldering bones.
Maps
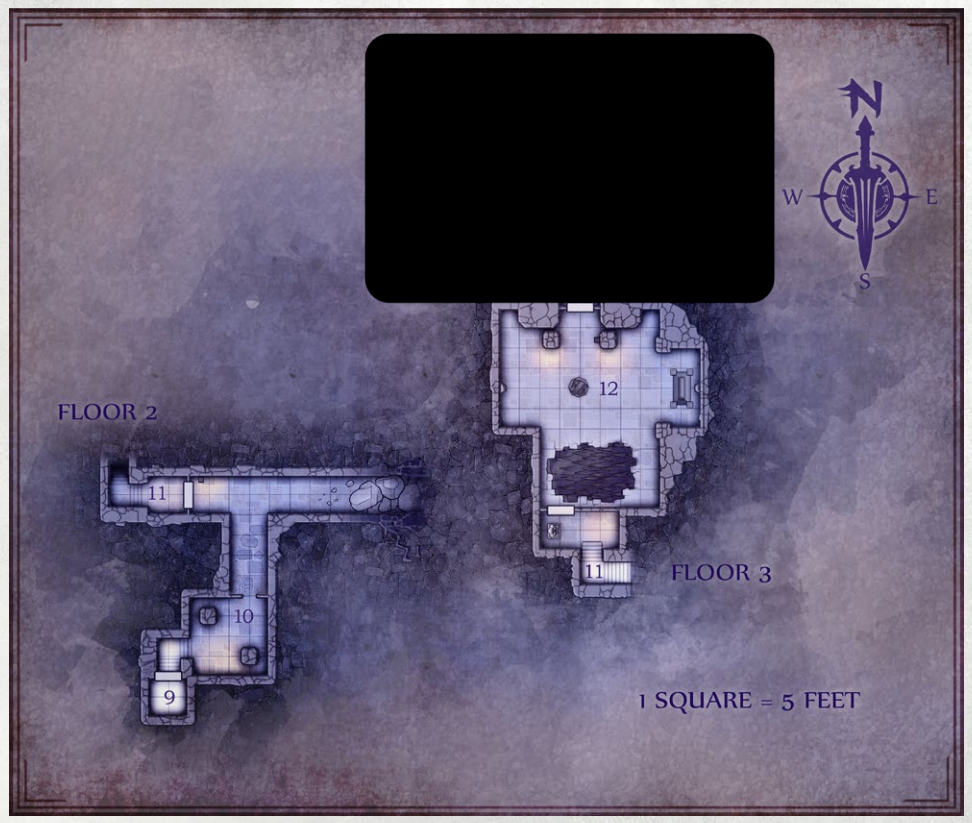
Floor 1

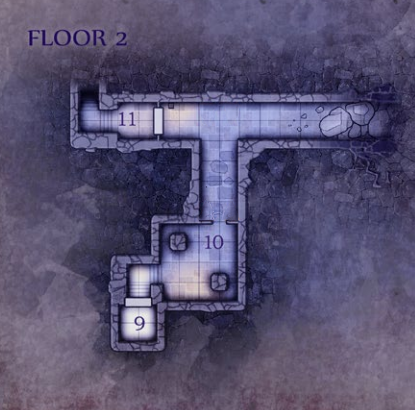
Floor 2
Floor 3
-
Area 1: Entry Chamber
A steep set of stairs leads sixty feet down fine granite carved doorway. Billy unlocks the door and leads you through. As you enter, you feel a strange wave of warmth pass through your body.
The door shuts loudly behind you as the last of your group passes through it, and the sound of the lock being turned on the other side is ominous. You stand in a short hallway. To the south, a thick metal portcullis gate is rusted shut, showing only a dark corridor beyond. To the north, the hallway opens up into a small room.
A large stone door with no handles stands to the north, with a large brass lever on the wall beside it. When the lever is pulled, a disturbingly loud scraping sound rings out. Dust billows as the thick stone door slides upward, revealing the area beyond. A magical torch around the corner of the hallway lights the way forward.
Doors and Gates
The areas of the crypts are separated by either iron portcullis gates or stone doors. The portcullis gates allow characters to see through them into the areas beyond. Most doors and gates are opened magically using levers on the “front side” of the door, closest to the entrance to the dungeon. This design was intended to allow areas of the crypts to be closed off from the outside if needed. Pulling a lever to raise or lower a door or gate is an action. Once open, a door or gate stays open until the lever is pulled again, or unless a door closes automatically as a security measure. If the characters are worried about someone closing the doors behind them, an open door can be held open by wedging a spike or similar object between it and the adjacent wall with a successful DC 12 Strength check. Unless otherwise noted, a door that has been closed can be forced open manually with a DC 25 Strength check, or can be opened with a knock spell or similar magic. All portcullis gates in the crypts creak and grind loudly when raised. The stone doors open with a loud scraping sound.
Treasure
Within the knapsack, the characters find a potion of healing that has the scent of brandy.
Area 2: Central Intersection
Two doors and an open corridor give the characters a choice of directions from this area.
Read
Two doors stand ahead of you—a metal portcullis gate to the west, and a stone door straight ahead to the north. Looking through the portcullis, another corridor extends some twenty feet before making a T-intersection. A brass lever stands beside the portcullis on the west wall.
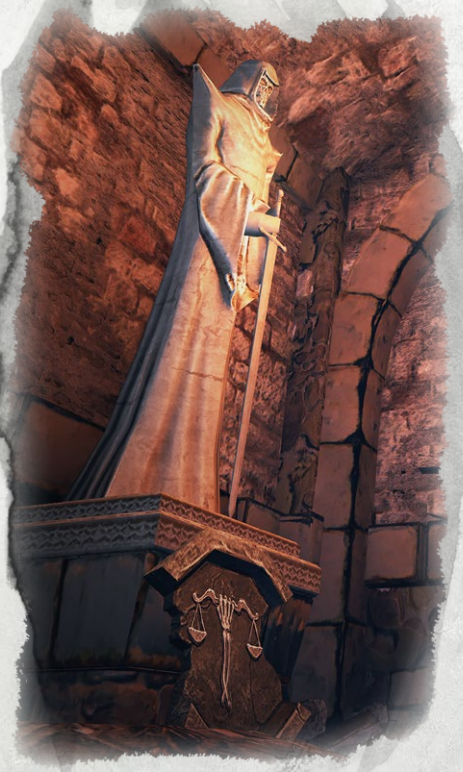
Where the passageway opens up to the east, it reveals both a larger room ahead and a statue of the god Kodor, its hands open as if it were holding something. A piece of carved marble sits on the floor at the statue’s feet. Opposite the statue is a small alcove set with a pile of humanoid bones. Pulling the lever raises the creaking portcullis, but there is no sign of a mechanism for the stone door. No action or magic available to the characters can open the door, and any ability checks made to search or open it result in failure. (This door opens automatically after the characters turn a special key in area 8.) The bones are the remnants of undead skeletons destroyed by the Grave Robbers when they recently passed this way. Broken Seal. The piece of carved marble at the feet of the statue is the first of the crypt’s broken seals.
Area 3: Main Crypt
Read
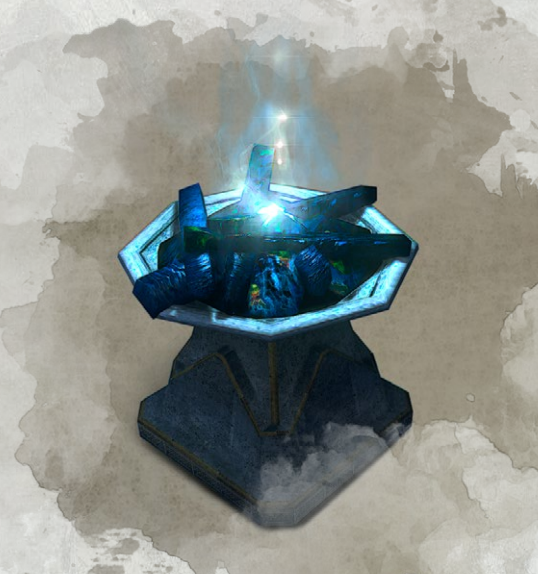
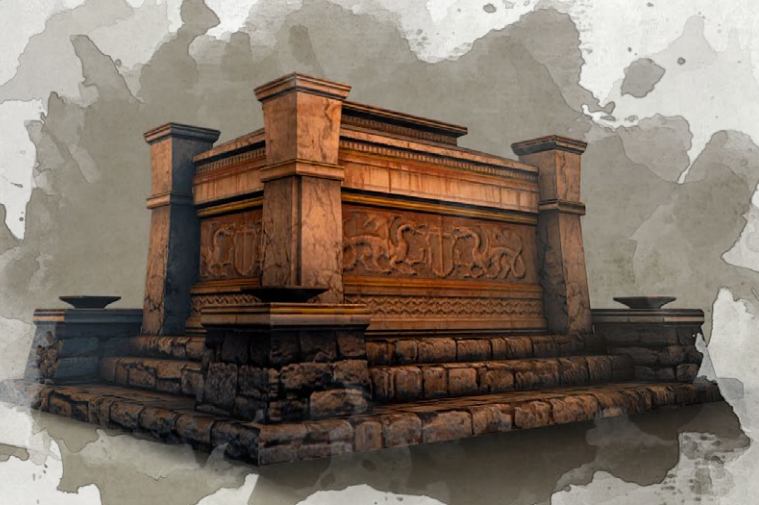
This huge chamber is supported by arched pillars, and features a ceiling ten feet high. Three ornate sarcophagi stand along the far wall, one of which has had its lid removed. Two torches along the side walls fill the room with magical light, revealing open doors along the north and south walls. In the center of the room, a waist-high marble brazier is carved with the symbol of Kodor—and has a mutilated body sprawled before it. Wood is stacked and ready for lighting within the brazier, suggesting that the body might have been an acolyte attempting to light it. A scroll lies on the floor next to the body.
With a successful DC 13 Wisdom (Perception) check, a character notices crouched figures lying in wait within the shadowed spaces between the sarcophagi.

Zombie Horde
name: Zombie Horde
creatures:
    - 18: Zombie
As soon as any character moves past the pillars closest to the doorway, eight zombies rise up from the shadows and attack. For a 4th-level party, use eleven zombies. For a 5th-level party, use fifteen zombies. The players should instinctively recognize that this is a potentially overwhelming group of foes—and should remember that focusing on lighting the brazier will aid their efforts to defeat the undead. The zombies are not smart enough to recognize the destructive potential of the brazier, and they attempt to fight within its light even as that light destroys them.
Doors
Stone doors lead into areas 4 and 5, both of them already raised. Each door has a lever beside it that can be used to lower and raise it.
Treasure
The characters can claim the spell scroll of prayer of healing dropped by the acolyte. Additionally, a search of the acolyte’s body reveals an additional striking stone and steel rod, letting two characters attempt to light a brazier at the same time.
Area 4: Trapped Tomb
Pressure plates (marked as triangles on the map) and a nonfunctioning trap in this room are not a threat, but should hopefully make the characters nervous as they explore. There is nothing of value in this room.
Read
This small chamber features a single sarcophagus, more ornate than those seen in the larger crypt. A destroyed zombie is sprawled at the foot of the sarcophagus, its splintered skull all but removed by some massive object. In front of you, you see that object—a spear coming out of one of two holes in the wall, which must have once been part of a trap guarding this area.
Area 5: Wight Tomb
Read
This chamber features ornately carved bas reliefs along the walls, showing the symbol of Kodor alongside magical inscriptions. The same inscriptions cover a sarcophagus against the far wall, which is far more ornate than those seen in the main crypt. The sarcophagus is set with large red gems just beneath its lid.
A detect magic spell or similar magic reveals the presence of warding and binding spells within the chamber.
!
If any character touches the sarcophagus, its lid suddenly bursts off. Any character within 5 feet of the sarcophagus must succeed on a DC 14 Dexterity saving throw or take 3 (1d6) bludgeoning damage and be knocked prone as the lid slams to the floor.
Wight Attack
name: Wight (modified)
creatures:
  - Wight, 55, 17
When the sarcophagus lid comes off, a wight in gleaming knight’s armor stands up within and leaps to the attack. At the same time, the room’s magical wards fill the area with a sickly, pulsing red light—and cause the door to slam shut unless it has been spiked open. The wight is weakened by the warding spells in the room, imposing disadvantage on its attack rolls. The wards also reduce it to 25 hit points for a 3rd-level party, or 35 hit points for a 4th-level party. Give it full hit points if facing a 5th-level party.
Wards
The magical wards are a boon to the characters, but their pulsing light can be distracting. Any creature that starts its turn in the room must succeed on a DC 10 Intelligence saving throw or have disadvantage on attack rolls until the start of its next turn.
Dealing with the Door
Any character standing in the entrance to this area when the door falls must decide which side of the door to move to. The character must also succeed on a DC 12 Dexterity saving throw or take 5 (1d10) bludgeoning damage and be knocked prone. Any characters left in area 3 when the door falls can pull the lever to open it and join the fight. If all the characters are in area 5, the door can be opened manually (see “Features of the Crypts,” above). After the fight, a successful DC 13 Intelligence (Investigation) check can be made to examine the door mechanism and locate a hidden latch that opens the door from inside. This check cannot be made in combat.
Treasure
The sarcophagus is set with four large sardonyx gemstones worth 10 gp each, all of which can easily be pried out
Area 6: Double Doors
Read
An intersection of corridors features two stone doors with a lever between them, a sarcophagus in an alcove, and a statue of Kodor with a broken seal in its hands.
Nothing hinders the characters from easily claiming this seal—unless they open the doors first. Pulling the lever opens both doors simultaneously, revealing the entrance to area 7 as well as this area—a web-filled chamber whose occupants are not happy to be disturbed.
Spider Hunt
name: Giant Wolf Spider
creatures:
  - 3: Giant Wolf Spider, 30, 15
The side chamber is the nest of three giant wolf spiders, all of which attack at once. For a 4th-level party, give each spider 18 hit points. For a 5th-level party, give each spider 23 hit points. If any spider is reduced to 5 or fewer hit points, it scrambles to the back of the side chamber and disappears up one of several rough, narrow tunnels leading to the creatures’ hunting grounds on the surface.
Treasure
Any search of the webs in the spiders’ nest uncovers a purse holding 15 gp, as well as a fine shortsword with a silver handle and a tooled silver scabbard, probably of drow make and worth 20 gp.
Area 7: Side Crypt
Read
A statue of Kodor with a broken seal at its feet stands along the east wall, while a brazier stands along the west wall. A tattered banner bearing the symbol of Kodor hangs on the wall above the brazier. Four ornate stone sarcophagi stand in the corners of the room, and in an alcove near the entrance. The sarcophagus in the far corner appears to have been broken in half.
A successful DC 15 Wisdom (Perception) check reveals movement within the broken sarcophagus.
Raging Zombie
name: Raging Zombie
creatures:
  - 1:
      creature: Ogre Zombie
      ac: 12
When any character moves more than halfway into the room, an enraged zombie leaps out of the broken sarcophagus, howling in hunger and racing toward the characters. Use the statistics of an ogre zombie for this more advanced foe, but the zombie is a Medium creature. For a 4th-level party, increase the zombie’s Armor Class to 9. For a 5th-level party, increase the zombie’s Armor Class to 10.
Treasure
The broken sarcophagus holds three tattered devotional scrolls (worth 10 gp total to a temple), and a silver necklace featuring a symbol of Torm (50 gp).
Area 8: Chapel
The characters are likely to see this area in two stages, interrupted by a fight with the chapel’s skeletal guardians.
Read
The corridor opens up to a large chamber with the look of a chapel. Its arched ceiling rises to a height of thirty feet, and magical light shines from the north. The southwest corner of the chamber holds seven plain sarcophagi with wooden coffins stacked between them, many of those rotten and broken open. A large support pillar has a statue of Kodor next to it, with a broken seal at its feet. Bones are scattered everywhere, but of more immediate concern are the skeletons that step out from behind the pillar, racing forward to attack.
Wandering Skeletons
name: Skeletons
creatures:
    - 16: Skeleton
The six skeletons in the initial part of the room attack any creatures they can see, and should interfere with the characters’ attempts to claim the broken seal or push farther into the room. For a 4th-level party, use eight skeletons. For a 5th-level party, use fourteen skeletons.
Getting to the Brazier
Characters who move far enough into the room to see the brazier on the dais will likely get the idea to rush for that area ahead of the skeletons, then light the brazier as the undead close in. Two things stand in their way, though—the zombies in the western alcove, and a spike trap at the top of the dais stairs (in the square indicated on the map).
Further Exploration
As the characters move farther into the room (whether during the skeleton fight or after that fight is done), reveal the details of the rest of the chapel. Depending on where the characters go, you might read or paraphrase only parts of the following text.
Read
Wide alcoves before the dais are each set with a stone sarcophagus and lit by a magical torch. The western alcove is occupied by zombies, hunched over something on the floor between them and seemingly oblivious to your presence. Standing between a pair of pillars, another statue holds a cracked seal in its hands. A ten-foot-deep dais to the north rises six feet above the floor, lit by a magical torch and reached by a short flight of steps. A brazier stands at the center of the dais, with a bas relief of a set of Kodor scales carved above it. Oddly, the scales are tipped to the left, where Kodor’s symbol normally shows them in balance. A large brass key is set into the wall beneath the symbol.
Zombie Diners
name: Distracted Zombies
creatures:
  - 7:Zombie
!
With a fresh meal in front of them, the two zombies ignore the party’s fight with the skeletons, not attacking until the first character approaches to within 10 feet of the northernmost statue, or if they are attacked first. For a 4th-level party, use four zombies. For a 5th-level party, use six zombies.
Stair Trap
!
At the top of the stairs, a hidden pressure plate triggers a mechanical trap. Any creature that steps on the trap causes a cluster of spikes to shoot up into their feet, and must make a DC 14 Dexterity saving throw. On a failed save, the creature takes 9 (2d8) piercing damage, or half as much damage on a successful save. A character searching the stairs and the dais notes the trap with a successful DC 13 Wisdom (Perception) check, and can easily step around it. A character climbing the stairs without searching spots the trap only if his or her passive Perception is 18 or higher. A character climbing the stairs at speed has no chance to spot the trap.
Unfortunate Visitor
The body being feasted on by the zombies wears the armor and regalia of a cleric, but has been mutilated beyond recognition. (The characters can learn later that this is one of the Grave Robbers. The last one of the group to climb down into this area, he was killed when his climbing rope broke.) Any character searching the north end of the room notes a pile of broken tile and stone on the ground next to thirty feet of rope with a frayed end. A hole in the ceiling above the pile connects to a rough tunnel leading aboveground, and has a short length of frayed rope visible where it’s tied off around a rock spur.
Turning the Key
The large brass key is magically fitted to the keyhole underneath the bas relief of Kodor’s symbol, and cannot be removed. When any character turns the key, the scales in the bas relief magically right themselves, and the characters hear the faint sound of a stone door grinding open in the distance, back toward the entrance. (This is the means by which the characters gain entrance to area 9 and the levels below.) Turning the key back in the other direction puts the scales out of balance once more and closes the door into area 9. Otherwise, after one hour, the key magically turns back, the scales go out of balance once more, and the door to area 9 automatically closes. (The Grave Robbers knew of the key’s function before entering the chapel through the hole in the ceiling. They quickly turned the key, then fled through this area to avoid fighting the undead here.)
Treasure
The dead cleric wears a breastplate in good condition, but it’s in bad need of cleaning. If the body is rolled over, the characters find a pouch with a broken potion vial in it, but the body’s weapons and pack are gone (quickly grabbed up by the Grave Robbers when they fled this area).
Area 9: Dark Stairs
When the adventurers return to the central intersection (area 2) after turning the key on the dais in area 8, they will see that the stone door to the north has opened as a result.
Read
Beyond the door stands a small room with a lever next to another stone door, already open. Beyond that door, a set of steep stairs leads down into darkness.
A character making a successful DC 12 Wisdom (Perception) check notes that the second door has been wedged with a spike to keep it open. The door from area 2 was likewise spiked, but the spike was shattered when the door magically closed. A successful DC 13 Wisdom (Perception) check discovers a hidden latch that opens the door to area 2 from inside this area.
Area 10: Warded Hall
Read
The initial chamber of this area holds only a pair of stone columns, but a dark hallway leads north toward a T-intersection and an east–west corridor
A successful DC 11 Wisdom (Perception) check notes a number of broken crossbow bolts around the southwest column and the southern wall of the initial chamber. This might offer the players a hint of the trap beyond.
Crossbow Trap
!
The north-leading hallway is set with a series of pressure plates in the floor, in the area between the triangles appearing on the map. The plates are made of iron concealed under years of dust and rubble, and can be spotted with a DC 15 Wisdom (Perception) check. Characters not spotting the trap will step on the pressure plates, causing four crossbow bolts to be fired through holes in the north wall. Any characters in the hallway or the eastern part of the initial chamber have the trap’s four attacks randomly divided among them: +4 to hit, 5 (1d10) piercing damage. The bolts fly the length of the hallway and hit the southwest column and the south wall if they don’t strike anyone. If the characters bypass the area and make it safely to the T-intersection, they can easily see the holes in the wall out of which the crossbow bolts fly.
Moving On
The eastern arm of the intersection leads to a collapsed section of hallway that can’t be dug out. To the west is a portcullis and a lever, with stairs seen just beyond. The portcullis is already open. Any check made to search it reveals that it is wedged with a spike so that it cannot be closed.
Area 11: Faintly Lit Stairs
Read
A set of stone stairs leads down to a landing, then turns to the north. From beyond the bend, a faint rise of flickering light intermittently dances across the walls.
An entry chamber at the bottom of the stairs features a statue holding a broken seal next to an open stone door. It can be easily noticed that the door is spiked open. Any character who reaches the base of the stairs and succeeds on a DC 11 Wisdom (Perception) check can hear distant voices.
Read
Voices from ahead are raised as if in argument, but are too far away for any details of the conversation to be heard.
See the next area for more information.
Area 12: Warded Chamber
From the entry room of area 11, the characters will be able to see some of the details of this room through the open door, as you determine.
Read
The floor of this rectangular chamber is breached directly in front of the door by a collapsed trap—a spiked pit fifteen feet across and nearly twenty-five feet side to side. Narrow ledges to both sides look as though they should allow passage around the pit. Near the center of the twenty-foot-high chamber, a brazier of balance stands unlit. A sealed sarcophagus is set off to the side.
It takes a successful DC 10 Dexterity check to walk around the spiked pit.
On a failed check, a character falls into the pit and must make a DC 12 Dexterity saving throw.
With a successful save, the character manages to land between the spikes, taking only 3 (1d6) slashing damage from their edges.
On a failed save, the character slams down onto the spikes and takes 10 (3d6) piercing damage.
If any character falls into the pit, the Grave Robbers across the room (see below) hear it and come over to investigate. Adjust the following part of the encounter as necessary.
The Grave Robbers
When the characters have moved through the open door to see fully into the room, add the following details.
Read
On the far side of the room, an oversized stone door stands closed. In shadowed light, two figures are pacing before the door and its lever, including one carrying an enormous sword. Their hushed argument carries across the room.
It takes a successful DC 12 Wisdom (Perception) check to hear the details of the argument between the adventurers known as the Grave Robbers. If none of the characters can hear the conversation, paraphrase the following action.
Read
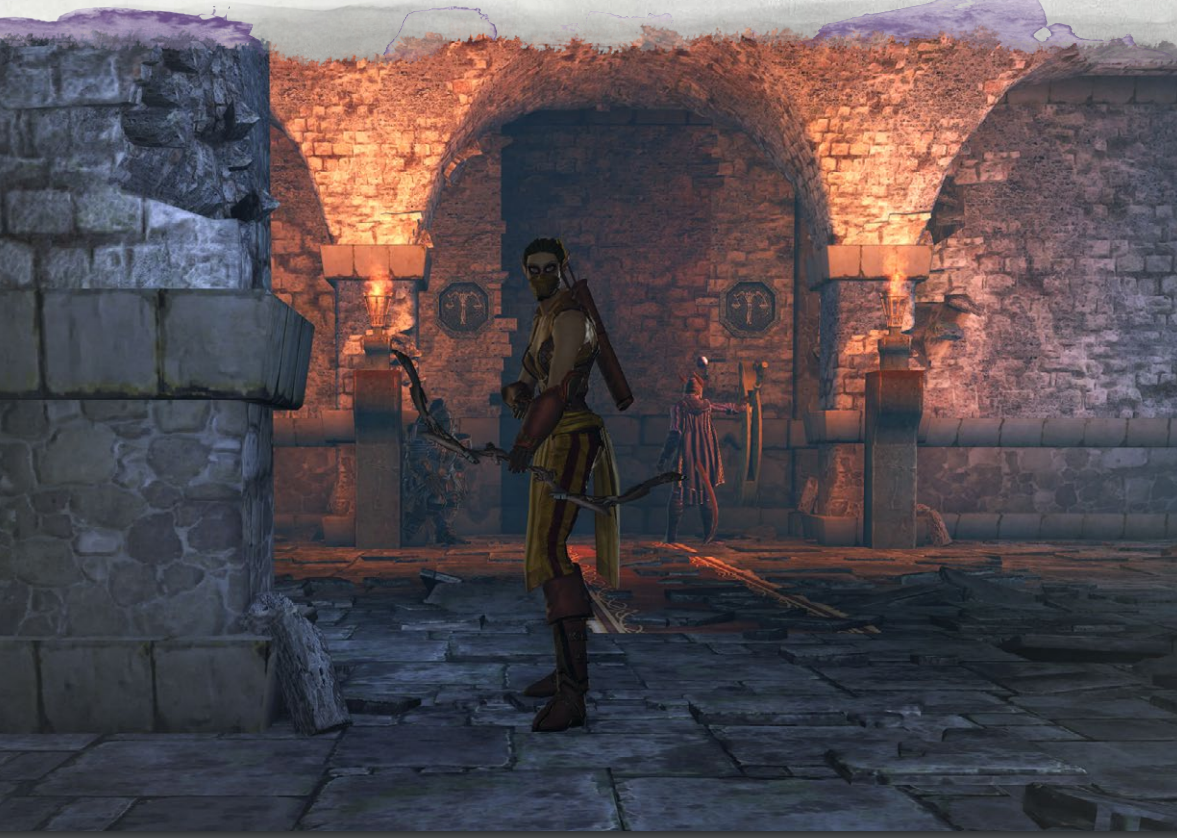
The figure with the sword seems impatient as he grunts, “You going to be there all day? Or should I smash it open now?” A figure closer to the door snarls back, “I’m a mage, not a rogue. There are heavy wards and strong magic keeping this door sealed.” “So you try, then,” the warrior says to someone unseen. “I told you, it’s a magic seal,” a third voice says. “Not my thing … Wait … what’s that?” Suddenly, the third figure steps out from behind a pillar—an archer with bow drawn. “We have company,” she calls to her companions.
Whether spotting the characters’ light or hearing the sound of their movement, the Grave Robbers’ rogue becomes aware of the characters’ presence as they draw close.
Friend or Foe?
This encounter can go a number of different ways, depending on whether the characters try to ally with the Grave Robbers, attempt to see them punished for their desecration of the crypts, or treat them as a direct threat and try to kill them outright. If the characters try to broker a deal with the group, use roleplaying and DC 14 Charisma (Persuasion) checks to determine their success. The Grave Robbers are opportunistic but honest, and are happy to work with the characters to get through to the next chamber in exchange for a fair split of any treasure found there. If the characters decide to fight the Grave Robbers—or if they fail badly at persuasion or try to intimidate the NPCs—the three are a potent threat. If the characters want the Grave Robbers punished, the NPCs can be rendered unconscious if defeated, then tied up for delivery to Soulhearth when the adventure is done.
Warded Door
Pulling on the lever of the stone door in this chamber has no effect as long as the powerful magical wards are in place that hold the door shut. A detect magic spell or similar effect, or a successful DC 15 Intelligence (Arcana) check, reveals that two separate magical wards seal the door. The door can be forced open with a successful DC 30 Strength check, or its wards can be undone with two knock spells. A character who studies the door and succeeds on a DC 13 Intelligence (Investigation) check senses that its magic feeds into the room in some way—a clue that lighting the brazier also unseals the door’s magical locks. When the brazier is lit, a pulse of light at the door announces that the wards have been disabled. Pulling the lever then opens the door.
The Grave Robbers
If the characters decide to take on the Grave Robbers, they are in for a tough fight: • Samulkin Farcaster is a tiefling mage and the leader of the group, who uses bravado to hide when he feels that he’s in a bit over his head. Use illusionist stats for Samulkin. • Gromlik Three-Teeth is a heavily armored warrior with sword and shield. Most folk think he’s a dwarf, but no one really wants to ask. Use knight statistics for Gromlik. • Cailyassa Forgedawn is a half-elf rogue with a shortbow— and a short temper. Use scout statistics for Cailyassa.
Their experience and savvy make the Grave Robbers a challenge for even a 5th-level party. For lower-level characters, make the following adjustments to Samulkin’s and Gromlik’s stats: • For a 3rd-level party, Samulkin has already expended his 3rd- and 4th-level spell slots and has only 19 hit points. Gromlik has only 26 hit points and cannot use his Leadership ability. • For a 4th-level party, Samulkin has already expended his 4th-level spell slot and has only 28 hit points. Gromlik has only 35 hit points.
name: Another Party
creatures:
    - 1: Samulkin
    - 1: Gromlik
    - 1: Cailyassa
Treasure
If the characters fight and defeat the Grave Robbers, they can claim their gear and treasure—mundane weapons and armor, three potions of healing, coins and gems worth 45 gp, and one uncommon consumable magic item of your choice.
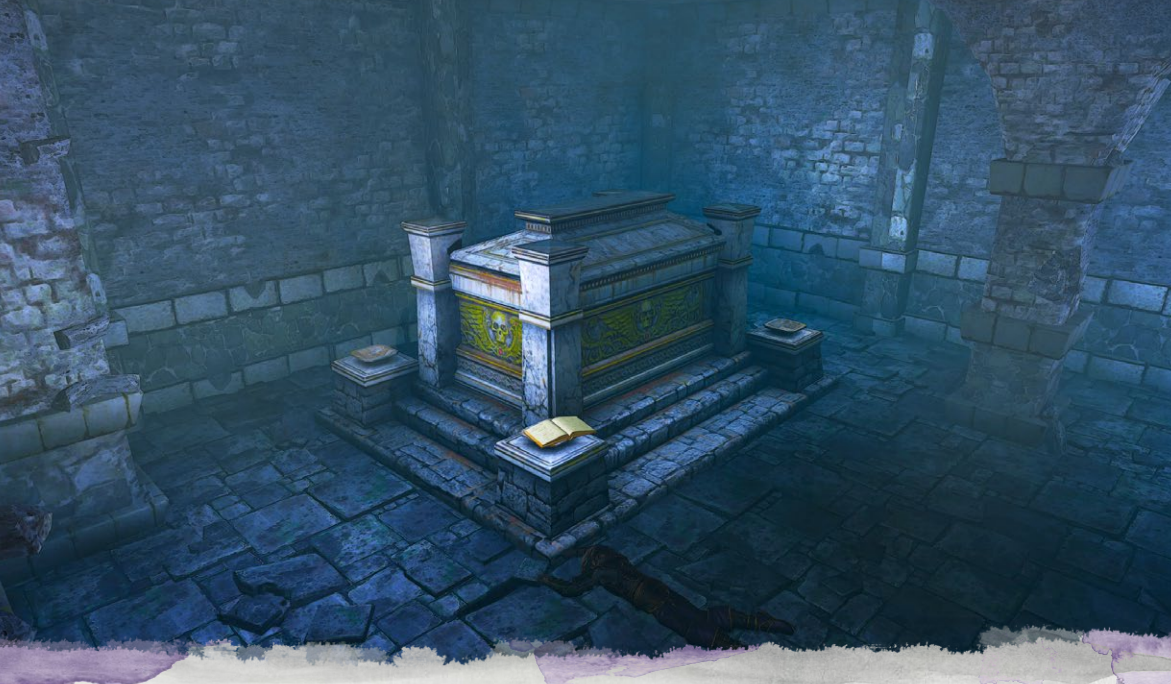
Area 13: Final Crypt
Read
A low-ceilinged chamber holds a statue of Kodor in the northeast corner, with a large chest before it and a broken seal at its feet. A single ornate sarcophagus stands to the west, with a dusty open book set on one of four small plinths that surround it. A giant tortle shell lays behind the sarcophagus, markings line the edges of the shell with skulls and whose engraving carries an arcane flavor not seen in the previous crypts. Near this shell lay motionless, 3 githyanki warriors.
With a successful DC 13 Intelligence (Arcana or History) check, a character recognizes that the sarcophagus’s inscriptions are Thayan in nature. A character with a background related to Thay knows this automatically. The book on the plinth is a dusty prayer book left here by the Kodorites, and worth 10 gp to a temple. The shell bears patterns recognized by friends of a tortle named Archie.
Vengeful Undead
name: Flameskull (w/NPCs)
creatures:
    - 1: Flameskull, 100
    - 3: Githyanki Warrior, 65

---
name: Flameskull
creatures:
    - Flameskull
    - 2: Githyanki Warrior, 30
A long-dead mage in the sarcophagus has been raised as a flameskull and woken from its undead slumber by the opening of the door into this area. Seeking freedom, it starts to hammer against the lid of its coffin. If the characters lift the sarcophagus lid, the flameskull attacks at once. If they do not, it casts lightning bolt (which it has prepared instead of fireball) to blast the sarcophagus open before it attacks. Any characters within 10 feet of the sarcophagus must succeed on a DC 12 Dexterity saving throw or be struck by shattered stone for 10 (3d6) damage. Other characters might “accidentally” be caught in the line of the blind-fired lightning bolt, as you see fit. If the Grave Robbers have accompanied the characters into this area, have them join the fight by giving their statistics blocks to three of the players. In that event, the flameskull has 80 hit points and can use its Fire Ray four times with its Multiattack trait. Roll randomly for each attack to determine whether the flameskull targets the player characters or the NPCs. If the characters can lure the flameskull into the light of the burning brazier in area 12, it will take damage only once from the brazier’s light before retreating and attacking at range.
Back Door
The characters (and any surviving Grave Robbers) can use the door in area 13 to leave the crypt if they have no reason to retrace their route back through the dungeon. However, the door has no lever, meaning it must be opened manually or with magic. The stairs climb sixty feet before emerging through a concealed door in a mausoleum near the temple of Kodor. (Soulhearth and his fellow acolytes were unaware of this long-forgotten second entrance into the crypts, and are grateful to the characters for bringing it to their attention so they can close it off.)
Treasure
The sarcophagus contains only rotting robes. The chest contains tokens and offerings to Kodor, most of which are worthless—but includes gems and coins worth a total of 200 gp. If the Grave Robbers fought through to this area with the characters, increase the amount of treasure so that the characters’ equal share amounts to the total above, and add an uncommon consumable magic item of your choice. The Grave Robbers are more interested in the cash, allowing the characters to haggle for the magic as you see fit.
Epilogue
If the characters fought alongside the Grave Robbers, the NPCs try to beat feet once above ground, not wanting to explain their presence in the crypts to the Kodorites. If the characters captured the NPCs, they can deliver them to Soulhearth along with the broken seals. He gives the characters the promised 20 gp, along with his thanks.
Read
Doomguide Soulhearth greets you happily upon your return. “By the scales, you are back! And with the broken seals! Very well done.” He beckons two younger priests to take the seals, then shakes each of you by the hand. “Thank you, friends. Your efforts have saved many today. We will repair and replace the seals before any more of those foul undead escape to ravage our countryside.” “We are but humble priests here. But please, take this token of our appreciation. Safe travels, and may Kodor always keep your path in the balance.”
Appendix: Monsters and NPCs
Flameskull
monster: FlameskullGiant Wolf Spider
monster: Giant Wolf SpiderRaging Zombie
name: Raging Zombie
monster: Ogre Zombie
Skeleton
monster: SkeletonWight
monster: WightZombie
monster: ZombieThe Grave Robbers
Samulkin Farcaster
name: Samulkin Farcaster (Illusionist)
monster: Illusionist Wizard
Gromlik Three-Teeth
name: Gromlik Three-Teeth (Knight)
monster: Knight
Cailyassa Forgedawn
name: Cailyassa Forgedawn (Scout)
monster: Scout